Integrations
Connect CapiBot to the tools you already use. This guide covers setting up Composio for 1000+ app integrations and GitHub for repository management.
Composio Integration
Composio provides unified access to 1000+ apps including Notion, Linear, Jira, Slack, Gmail, Airtable, and many more.
Getting Your Composio API Key
Step 1: Sign Up for Composio
- Go to composio.dev
- Click "Get Started" or "Sign Up"
- Create an account with your email or GitHub
- Verify your email address
Step 2: Get Your API Key
- Log into your Composio dashboard
- Navigate to Settings → API Keys (or Developer → API Keys)
- Click "Create New API Key"
- Give it a name:
CapiBot Integration - Copy the API key (starts with
composio_)
Step 3: Add API Key to CapiBot
- Open Mission Control (
http://localhost:3002) - Go to Settings → Integrations
- Find the Composio section
- Paste your API key in the field:
Composio API Key: composio_xxxxxxxxxxxxxxxx - Click "Save" or "Connect"
- You should see: ✅ Connected
Connecting Apps via Composio
Once your Composio API key is added, you can connect individual apps.
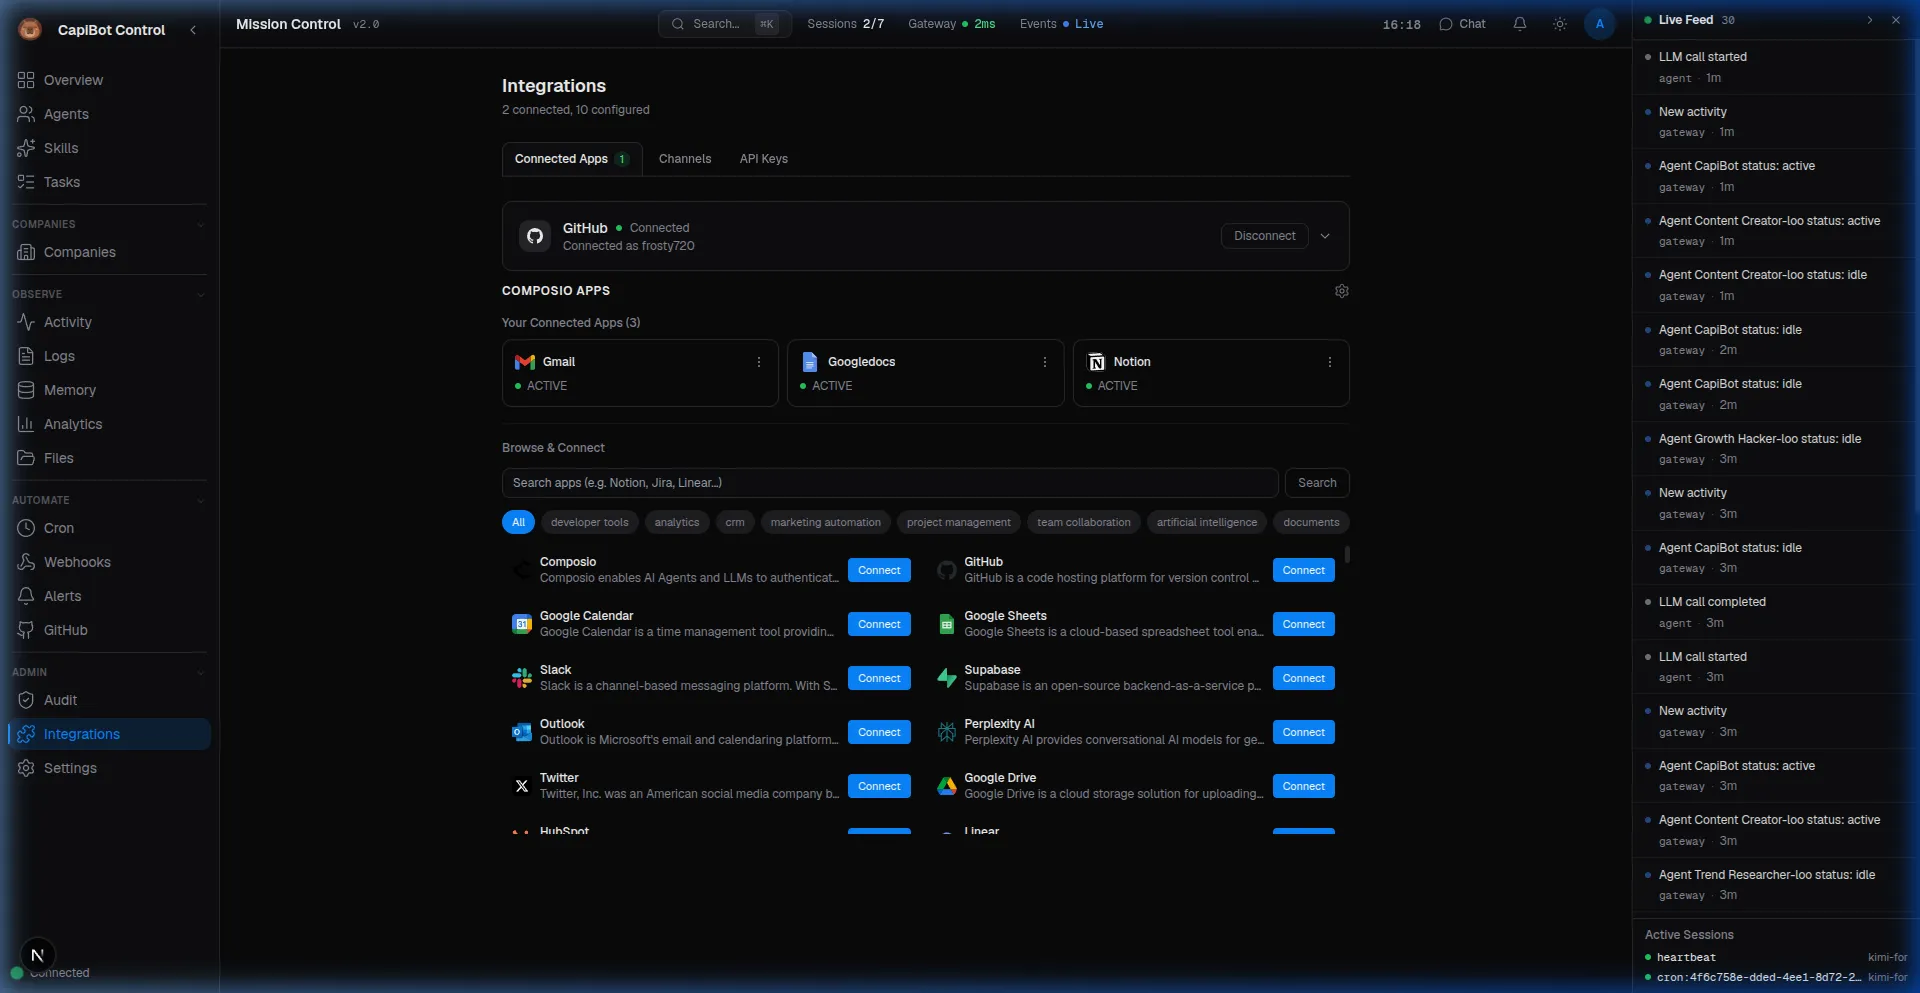 Screenshot: Integrations panel showing connected apps and the Composio marketplace
Step 1: Browse Available Apps
- In Mission Control, go to Integrations → Composio
- Browse or search for apps (Notion, Linear, Slack, etc.)
- Apps are organized by category (Project Management, Communication, CRM, etc.)
Step 2: Connect an App
- Find the app you want (e.g., Notion)
- Click "Connect"
- You'll be redirected to the app's OAuth authorization page
- Sign in to your app account (if not already signed in)
- Review the permissions requested
- Click "Authorize" or "Allow"
- You'll be redirected back to Mission Control
- The app now shows: ✅ Connected
Step 3: Configure App Access Some apps let you configure what CapiBot can access:
For Notion:
- Select which pages/databases to share
- Choose access level (read-only or read-write)
- Click "Allow access"
For Slack:
- Choose which workspace to connect
- Select channels the bot can access
- Grant permissions (send messages, read messages, etc.)
For Linear:
- Choose which teams to connect
- Set issue access permissions
- Configure webhook settings
Using Composio-Connected Apps
Once connected, agents can use these apps through the Composio skill.
Example: Creating a Notion Page
You: Create a Notion page called "Project Ideas" with our
     meeting notes

Agent: [Uses composio skill]
       1. Checks Notion is connected ✅
       2. Finds "create page" action
       3. Creates page with your notes

       ✅ Created "Project Ideas" page in Notion
       View it: https://notion.so/...
Example: Sending a Slack Message
You: Send a message to the #engineering channel that the
     deployment is complete

Agent: [Uses composio skill]
       ✅ Message sent to #engineering:
       "Deployment complete! 🚀"
Managing Composio Connections
View Connected Apps:
- Go to Integrations → Composio
- See all connected apps with status
- Green checkmark = Connected and working
- Red X = Connection issue
Reconnect an App: If an app shows an error:
- Click the "Reconnect" button
- Re-authorize the app
- Update permissions if needed
Disconnect an App:
- Find the app in the list
- Click "Disconnect"
- Confirm: "This will remove access to [App]"
- CapiBot will no longer be able to use this app
Common Composio Issues
"No apps connected"
- You haven't connected any apps yet
- Go to Composio tab and click "Connect" on desired apps
"App connection expired"
- OAuth tokens expire after some time
- Click "Reconnect" to refresh the connection
"Permission denied"
- The app is connected but lacks required permissions
- Disconnect and reconnect with broader permissions
- Or check app settings in Composio dashboard
"Rate limit exceeded"
- Too many API calls in a short time
- Wait a few minutes and try again
- Consider upgrading your Composio plan
GitHub Integration
Connect GitHub to sync issues, pull requests, and repository activity with CapiBot tasks.
Getting Your GitHub Personal Access Token
Step 1: Go to GitHub Settings
- Log into your GitHub account
- Click your profile picture (top right)
- Select Settings
- Scroll down and click Developer settings (left sidebar)
Step 2: Create a Personal Access Token
- Click Personal access tokens → Tokens (classic)
- Click "Generate new token" → "Generate new token (classic)"
- You may need to re-enter your password
- Give your token a name:
CapiBot Integration - Set expiration (recommended: 90 days)
- Select scopes (permissions):
Required Scopes:
☑️ repo            (Full control of private repositories)
   ☑️ repo:status   (Access commit status)
   ☑️ repo_deployment  (Access deployment status)
   ☑️ public_repo   (Access public repositories)
   ☑️ repo:invite   (Access repository invitations)
☑️ admin:repo_hook  (Full control of repository hooks)
Optional Scopes (for more features):
☑️ read:org        (Read org and team membership)
☑️ read:user       (Read user profile data)
☑️ read:project    (Read project boards)
- Scroll down and click "Generate token"
- Important: Copy the token immediately!
- It starts with
ghp_ - GitHub will only show it once
- Store it securely
- It starts with
Step 3: Add Token to CapiBot
- Open Mission Control (
http://localhost:3002) - Go to Settings → Integrations → GitHub
- Paste your token:
GitHub Personal Access Token: ghp_xxxxxxxxxxxxxxxx - Click "Connect"
- You should see: ✅ Connected
Setting Up GitHub Sync
Once connected, configure what to sync.
Step 1: Select Repositories
- Go to Integrations → GitHub Sync
- You'll see a list of repositories you have access to
- Check the boxes next to repositories you want to sync
- Click "Save Selection"
Step 2: Configure Sync Settings
Sync Mode: [Import issues as tasks ▼]
  • Import issues as tasks
  • Two-way sync (tasks ↔ issues)
  • Read-only (monitor only)

Filters:
  ☑️ Open issues only
  ☐ Include pull requests
  ☑️ Specific labels: [bug, feature, urgent]
  ☐ All labels

Auto-Assign Rules:
  When: Issue labeled "frontend"
  Assign to: @Pixel (Designer)

  When: Issue labeled "backend"
  Assign to: @Nova (Engineer)

  When: Issue labeled "bug"
  Priority: High
Step 3: Test the Sync
- Create a test issue in one of your connected repositories
- Add a label that matches your filter (e.g., "bug")
- Wait 30-60 seconds
- Check Tasks panel in Mission Control
- You should see the issue imported as a task
How GitHub Sync Works
Real-Time Sync:
GitHub Issue Created
        ↓
GitHub sends webhook to CapiBot
        ↓
CapiBot receives webhook
        ↓
Task T-123 created from issue
        ↓
Assigned based on label rules
        ↓
Agent gets notified
        ↓
Agent works on task
        ↓
Task completed in CapiBot
        ↓
GitHub issue closed (if two-way sync)
Sync History: View all synced items:
Recent Imports

✅ #234 "Fix login bug" → T-123 (Nova)
   Synced: 2 min ago | Label: bug

✅ #235 "Add dark mode" → T-124 (Pixel)
   Synced: 5 min ago | Label: feature

⚠️ #236 "Update docs" → Skipped
   Reason: No matching label filter
Managing GitHub Sync
Pause/Resume:
- Temporarily stop syncing without disconnecting
- Useful during maintenance
- Go to GitHub Sync → Click "Pause"
Selective Sync: Only sync specific issues:
Labels to sync: [bug, feature, urgent]
Ignore: [wontfix, duplicate, question]
Bulk Import: Import all existing issues:
Import all open issues?
Repository: my-org/my-project
Issues found: 47

☑️ Yes, import all 47 issues
☐ Assign to default agent: @Nova
☐ Set priority based on labels
Common GitHub Issues
"Authentication failed"
- Token may have expired
- Generate a new token
- Token may lack required scopes
- Check scopes and regenerate
"Repository not found"
- You may not have access to that repository
- Check repository permissions
- Try a repository you own or are a collaborator on
"Webhook delivery failed"
- CapiBot may not be publicly accessible
- Check webhook URL in GitHub settings
- Ensure CapiBot is running and accessible
"Issues not syncing"
- Check label filters match your issues
- Verify sync is enabled (not paused)
- Check sync history for errors
API Keys Management
Centralized management of all integration keys.
Access: Settings → API Keys
Viewing API Keys
┌─────────────────────────────────────────────────────────┐
│ API Keys Management                                     │
├─────────────────────────────────────────────────────────┤
│                                                         │
│ Integration API Keys                                    │
│                                                         │
│ Composio API Key                                        │
│ Status: ✅ Active                                      │
│ Last used: 5 min ago                                   │
│ [View Key] [Regenerate] [Delete]                       │
│                                                         │
├─────────────────────────────────────────────────────────┤
│                                                         │
│ GitHub Personal Access Token                            │
│ Status: ✅ Active                                      │
│ Scopes: repo, admin:repo_hook                          │
│ Expires: Dec 15, 2024                                  │
│ [View Key] [Regenerate] [Delete]                       │
│                                                         │
└─────────────────────────────────────────────────────────┘
Adding New API Keys
Step 1: Click "Add New Key"
Step 2: Select Integration Type
- Composio
- GitHub
- Serper (Web Search)
- Groq (Voice Transcription)
- Custom
Step 3: Enter Key Details
Integration: Composio
Name: My Composio Key
Key: composio_xxxxxxxxxxxxxxxx
Step 4: Save and Test
- Click "Save"
- Click "Test Connection" to verify
- Should show: ✅ Connection successful
Rotating Keys
When to Rotate:
- Every 90 days (best practice)
- If you suspect compromise
- When an employee leaves
- After security incidents
How to Rotate:
- Generate new key in external service
- Go to Settings → API Keys
- Find the old key
- Click "Regenerate"
- Paste new key
- Click "Save"
- Old key becomes invalid immediately
Security Best Practices
For Composio:
- Use a dedicated Composio account for CapiBot
- Don't use your personal Composio account
- Review connected apps regularly
- Remove unused app connections
For GitHub:
- Use fine-grained tokens when possible
- Limit token expiration to 90 days
- Only grant minimum required permissions
- Don't commit tokens to repositories
- Use environment variables in production
General:
- Never share API keys in messages
- Don't include keys in screenshots
- Rotate keys regularly
- Monitor usage for anomalies
- Revoke keys immediately if compromised
Integration Health Monitoring
Check the status of all your integrations in one place.
Access: Settings → Integration Health
┌─────────────────────────────────────────────────────────┐
│ Integration Health                                      │
├─────────────────────────────────────────────────────────┤
│                                                         │
│ ✅ Composio                                             │
│    API: Connected                                       │
│    Apps: 5 connected (Notion, Linear, Slack, ...)      │
│    Last check: Just now                                │
│                                                         │
│ ✅ GitHub                                               │
│    Token: Valid (expires in 45 days)                   │
│    Webhooks: 3 active                                  │
│    Repositories: 5 synced                              │
│    Last sync: 2 min ago                                │
│                                                         │
│ ⚠️  Slack                                               │
│    Connection: Active                                  │
│    Warning: Rate limit (87% used)                      │
│    Action: Monitor usage                               │
│                                                         │
│ ❌ Linear                                               │
│    Connection: Expired                                 │
│    Error: Token revoked                                │
│    Action: Reconnect required                          │
│    [Reconnect Now]                                     │
│                                                         │
└─────────────────────────────────────────────────────────┘
Troubleshooting Integration Issues
Connection Shows "Disconnected"
- Check API key is valid
- Verify key has required permissions
- Test connection manually
- Re-enter key if needed
"Rate Limit Exceeded"
- Wait for rate limit reset
- Reduce sync frequency
- Upgrade service plan
- Contact support if persistent
"Webhook Delivery Failed"
- Check CapiBot is publicly accessible
- Verify webhook URL is correct
- Check firewall settings
- Review webhook logs
"Sync Delayed"
- Check integration health
- Verify sync is enabled
- Look for error messages
- Try manual sync trigger
Integration Patterns
Pattern 1: GitHub + CapiBot Development Workflow
GitHub Issue Created → CapiBot Task Created
        ↓                        ↓
   Labeled "bug"          Assigned to @Nova
        ↓                        ↓
   Nova fixes bug         Task completed
        ↓                        ↓
   PR created             Deliverable attached
        ↓                        ↓
   PR merged              Task closed
        ↓                        ↓
   GitHub issue closed ←── Task done
Pattern 2: Composio Knowledge Management
Agent researches topic
        ↓
Findings saved to Notion (via Composio)
        ↓
Organized in company knowledge base
        ↓
Other agents reference Notion docs
        ↓
Knowledge grows over time
Pattern 3: Multi-Tool Automation
Cron job triggers daily
        ↓
Agent checks GitHub issues (via GitHub)
        ↓
Creates summary in Notion (via Composio)
        ↓
Sends Slack notification (via Composio)
        ↓
Team sees daily update
Best Practices
Getting Started
- Start with One Integration — Don't connect everything at once
- Test Thoroughly — Verify each integration works before relying on it
- Document Your Setup — Note which keys are used where
- Monitor Usage — Check integration health regularly
Security
- Use Dedicated Accounts — Don't use personal accounts for integrations
- Minimum Permissions — Only grant required access
- Regular Rotation — Rotate keys every 90 days
- Monitor Logs — Watch for unusual activity
Maintenance
- Health Checks — Review integration status weekly
- Update Apps — Keep connected apps current
- Clean Up — Remove unused integrations
- Backup Keys — Store securely offline
Next Steps
- Review Administration for system settings
- Learn about Security Best Practices
- Explore Automation with your new integrations